How to Transfer Photos from PC to iPhone? [iPhone 13]
Wouldn’t you agree that taking so many hours just to get that perfect click deserves to be saved on every device? After all, you must be excited to show that perfect click to everyone. And to your surprise, you find that it is just becoming next to impossible to transfer photos from pc to iPhone, like iPhone 13/12/11/X. I wish there was a way that was just as simple as cut and moves or copies and pasted your photos. But it is not possible since the devices run on different platforms. Also, the process takes some time to recognize the device and completely configure the system for the process. Is there no way to resolve the issue?
Fortunately, there is good news for all the photo-savvy people. Many quick methods are available in the market to transfer your photos. The article will guide you through two methods to show you how to transfer pictures from computer to iPhone. Not only will I be learning the method, but I will also be effortlessly using the process. The methods will make your picture transfer process smooth and flawless.
اقرأ المزيد: How to Transfer Photos from iPhone to Windows PC?
Part 1: Transfer photos from PC to iPhone, including iPhone 13/12/11/X using iTunes
iTunes is the ultimate all-in-one hub for handling all your multimedia needs. The iTunes by Apple is the single multimedia suite that you will ever need to manage your multimedia from all the Apple devices. iTunes gives you all kinds of tools to ensure that your experience with the device is as flawless as possible. Here, we will see how to import photos from pc to iPhone using iTunes. After this, you will be able to use the method just with a few clicks of the mouse.
Step 1: First of all, with the help of your USB driver, connect the iPhone device to the PC. After that, launch iTunes (you must ensure that it is updated).
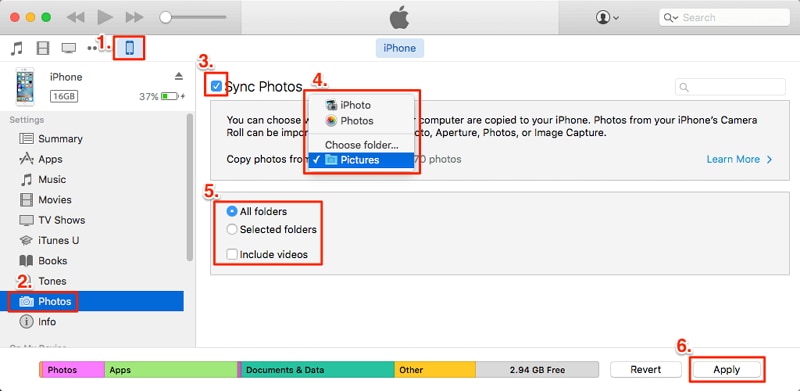
Step 2: After the iTunes page opens, the next step will be to visit the Device icon > there from left pane go for Photos option > then you will see the syncing page for photos appear > you need to click on sync photos option > doing so will ask you to choose the desired folder where you want to save the photos, let’s say you have the option to save in iPhoto option, Photos folder or else you can choose any other folder as per your requirement >, and finally press Apply.
Note: In case you need all folders to get transferred from your PC, then under marked number (5), select all folders; otherwise, choose the selected folder and then go for apply the transfer/syncing process for your photos.

The process takes a few minutes, and more ever, it only needs iTunes to transfer the photos from desktop to iPhones. But as you continue to use you will start to find the process daunting since iTunes is known to crash several times. Is there no better alternative to the above solution? To find out more, proceed with the next part of the article on how to transfer photos from pc to iPhone without iTunes.
Part 2: Transfer photos from PC to iPhone, including iPhone 13/12/11/X without using iTunes
As discussed earlier, iTunes is the one suite you will ever need for the multimedia task. Unfortunately, the software is not perfect in every sense, especially when transferring files from your computer to the iPhone. To solve this problem, we present you to DrFoneTool – مدير الهاتف (iOS), a tool you will ever need to handle all the kinds of transfer-related problems.

DrFoneTool – مدير الهاتف (iOS)
Transfer photos to your iPhone without iTunes
- Transfer music, photos, videos, contacts, messages, etc. between computer and iOS devices
- Transfer media files between iPhone/Android and iTunes.
- Access and manage your iPhone device in file explorer mode using a computer.
- Batch install and uninstall apps on the iPhone.
Now let us see how to copy photos from pc to iPhone using DrFoneTool – Phone Manager(iOS).
Step 1: Download the free copy of DrFoneTool – Phone Manager (iOS) from the above blue section.
الخطوة 2: قم بتثبيت التطبيق واقبل الشروط والأحكام لمتابعة عملية نقل الصور من الكمبيوتر إلى iPhone.
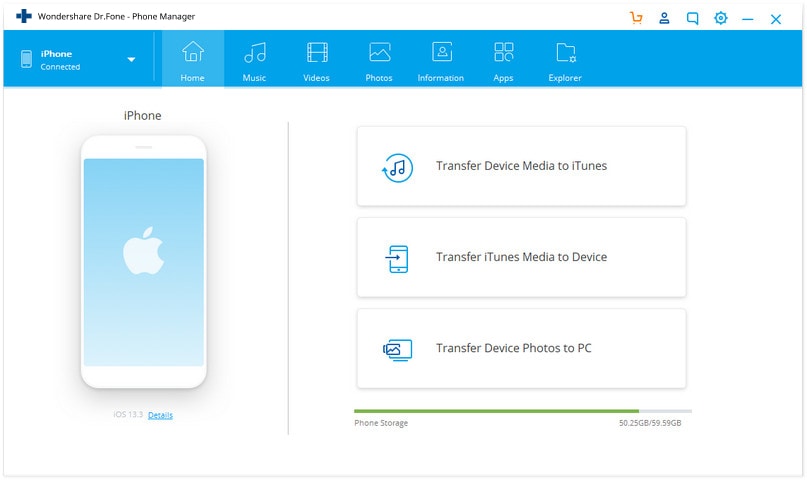
Step 3: As you will see, the interface is lucid and intuitive to use. Click on the ‘Phone Manager’ tile on the home screen.

Step 4: Connect your iPhone to the pc. The system will take a couple of moments to recognize your device. Once the device is recognized, you will be able to see the device name and photo in the DrFoneTool interface.
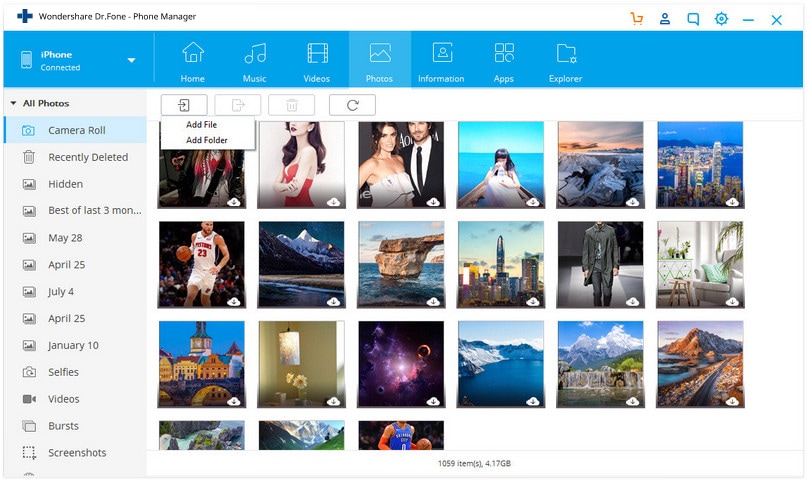
Step 5: On clicking on the transfer tile, you must have been presented with various options that are available in the DrFoneTool – Phone Manager feature. Click on the button that says ‘Photos’ under the menu tab.

Step 6: The software will analyze the files present in your system and your device. Now click Add File or Add Folder and select the files that you would like to transfer from pc to device.

After selecting the required files, you need to add a file (for selected ones), or you may also choose an alternate way, which is to select Add folder (for all photos), which you wish to transfer from PC to iPhone.
The process is simple and user-friendly. It works every time. What’s more, the software never overwrites the current file already present in the device. So, it is a safe process.
DrFoneTool is the best toolkit available in the market, and after reading the article, you now know how to import photos from computer to iPhone. In case you do not have much requirement of transferring files, then you can stick to handle the case. But, for most users who love to click the photo, DrFoneTool – Phone Manager (iOS) comes as a great savior to answer the problem of how to import photos from pc to iPhone. In short, we would say that DrFoneTool – Phone Manager (iOS) is the best software to transfer photos from computer to iPhone. So, go ahead and try it right away.
أحدث المقالات

