The Ways to Sync iTunes Library to iPhone
iTunes is tech giant Apple’s software that lets Mac and iPhones users easily download, play, and manage video & content on their iOS devices.
This software was launched in the year 2001, then iTunes provided a music player and a means for Mac users to maintain their digital content effortlessly. Besides, the ability to sync to their iPods.
Later in the year 2003, a new feature was introduced, it was to buy music.
In 2011, this software was integrated with the iCloud service, which presented users the freedom to sync media, Apps, and other content across multiple devices. An Apple username and password are all needed to access your iTunes, iTunes Store, and iCloud.
In this post, we’ve curated a step-by-step mini-guide on syncing iTunes library to iPhone directly. So, without wasting any time, let’s get on with it.
Part 1: Steps for Transferring iTunes Library to iPhone Directly
You can use iTunes to sync content with your iPhone, iPad, or iPod with your personal computer. If you have macOS Mojave or a Windows PC, then iTunes software is all you need to sync music, video, and other media content to your devices.
However, before you sync content to your iPod or iPad, you need to consider Apple Music or iCloud, this will securely keep your PCs content safely on the cloud, and not to mention large storage capacity for storing all your favorite media content.
Doing so you’ll be able to easily access your media content even when you are not around the PC. So, without wasting time, let’s get on with the step-by-step procedure to transfer iTunes Library to the iPhone directly.
What content can be synced with iTunes?
Here, are the content types that you can maintain in your iTunes software:
- Songs, albums, podcasts, and audiobooks
- 图片
- 视频
- 联系我们
- 日历
How to Transfer iTunes Library to iPhone?
步骤1: You need to launch iTunes on your Mac or Windows PC. In case, you don’t have the iTunes, you can download it from here – support.apple.com/downloads/itunes
After that connect your device, to which you want to sync your videos, photos, songs, and contacts from your personal computer via the USB cable.
步骤2: The next thing you go to do is to click the device on the upper-left corner of the iTunes screen as shown below.

步骤3: From the long list under the settings tab in the left panel of the iTunes, you have to select the content you want to sync, be it the music, photos, audiobooks, movies, T.V. shows, and so much more.
步骤4: Once you have selected the type of content to sync, choose the appropriate tick boxes as described below through the picture.
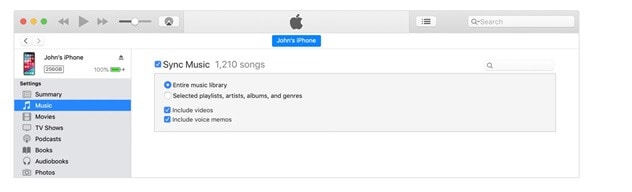
步骤5: The last step is to hit the apply button present in the lower-right corner of the iTunes screen. The syncing will commence right away, if not, then the sync button.
Part 2: Solution If You Can’t Sync iTunes Library to iPhone
In case you are unable to sync iTunes library to iPhone, then we have a quick solution for you or if your PC doesn’t have enough disk to accommodate such a space-eating software. The answer is DrFoneTool software.
It is Free software that lets Mac and Windows PC users transfer iTunes libraries to the iPhone. This software works with iPod, iPad touch models, and iOS devices. This software is safe to use as it developed Wondershare, a trusted name in the world of user applications with the most up-to-date safety features.
The procedure we mentioned earlier to sync iTunes library to iPhone seems easy-peasy, but it is not as it has its own set of problems. One to mention is iTunes requires a lot of RAM on your personal computer. And, for some people, adding the iTunes library to the iPhone simply doesn’t work.
This is the reason, we in this post have come up with an alternative, so let’s check the step-by-step guide on how to get iTunes library onto iPhone.
Download the DrFoneTool software for windows/Mac – https://www.drfonetool.com/cn/iphone-transfer/how-to-add-music-from-itunes-to-iphone.html


步骤1: Download the DrFoneTool software on your personal computer. Once you’ve downloaded the software, double click the software on your computer, and follow the on-screen instruction. It’s like installing any other application on your computer.
步骤2: The next step is to connect your iOS device to your personal computer when the DrFoneTool software is running, the Phone Manager will automatically recognize the device; this won’t take more than a few seconds to get started.
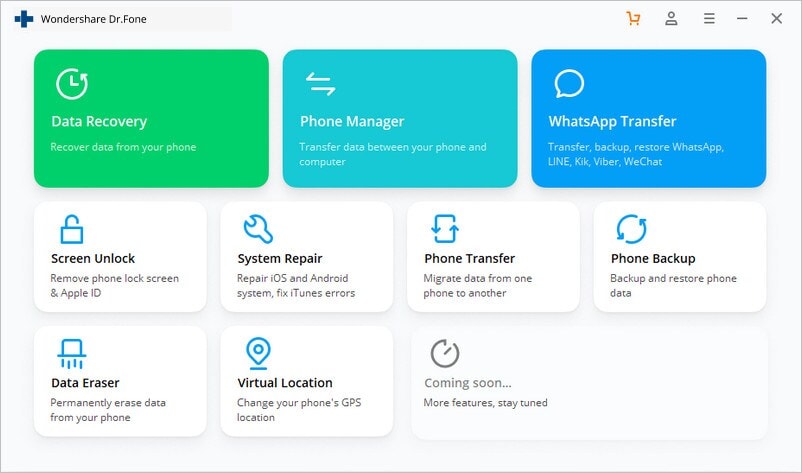
步骤3: Click the “Phone Manager” option on the main menu of the software.
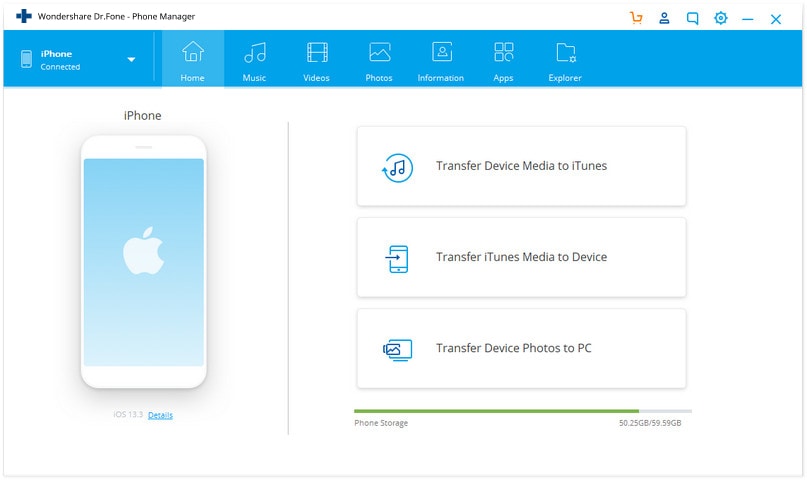
步骤4: Then click ‘transfer iTunes media to device” in the transfer menu.
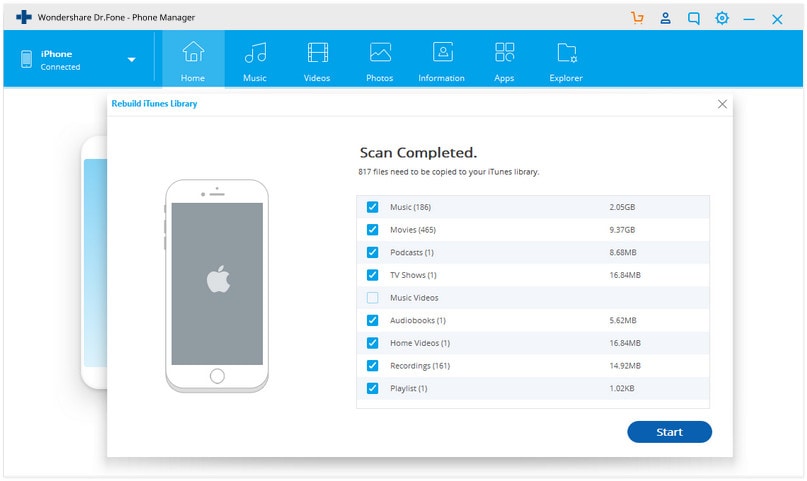
步骤5: In this step, the DrFoneTool software will thoroughly scan your iTunes library, displaying all the files.
步骤6: The final step is to select the file types which you want to transfer to your iPhone, at last click “transfer.”
The process of transferring the iTunes library to the new iPhone will take a few minutes. It depends upon the volume of files you’ll be transferring. You can repeat the process multiple times to have all your music content on your iPhone.
总结
After thoroughly analyzing both ways of syncing the iTunes library to the iPhone, it is easy to deduce that using DrFoneTool software is the best option. It is a Free software that you can download on your Mac and Windows PC. In case you have a doubt, you can check out the details on the DrFoneTool software guide on syncing iTunes library to the iPhone.
We would love to hear your views in the comment section of this blog post!
最新文章