Tips og tricks til, hvordan du sikkerhedskopierer iPhone til Mac
How can I backup files, including music, photos, and videos from my iPhone to MacBook Pro running in OS X Mavericks? iTunes just refused to do anything like it syncs files to an iPhone. Please help. Thanks! – Owen
For at sikre sikkerheden af dine iPhone-indstillinger og -filer, bør du sikkerhedskopiere din iPhone regelmæssigt. Når noget går galt med din iPhone, kan du nemt Gendan iPhone fra backup. I det følgende er løsninger på, hvordan du sikkerhedskopierer iPhone til Mac, samt relaterede oplysninger dækket. Klik for at læse den del, du er interesseret i:
- Part 1. How to backup iPhone to Mac with iTunes and iCloud(free)
- Del 2. Sådan sikkerhedskopieres iPhone til Mac med DrFoneTool (fleksibel og hurtig)
- Del 3. Placering af iPhone Backup-fil (Mac) og inkluderede filtyper
Part 1. How to backup iPhone to Mac with iTunes and iCloud(free)
1. Sådan sikkerhedskopieres iPhone på Mac med iCloud
Hvis det er besværligt for dig at forbinde din iPhone med Mac for at sikkerhedskopiere iPhone på Mac via iTunes, vil du måske gerne bruge iCloud til at sikkerhedskopiere iPhone til Mac uden iTunes. Det er ret nemt at sikkerhedskopiere iPhone til Mac med iCloud. Det eneste du skal sikre dig er, at netværket er stabilt. Nedenfor er trinene til at sikkerhedskopiere iPhone på Mac uden iTunes, men iCloud.
Steps to backup iPhone to Mac with iCloud
- • Step 1. Connect your iPhone with Wi-Fi and make sure the network is stable;.
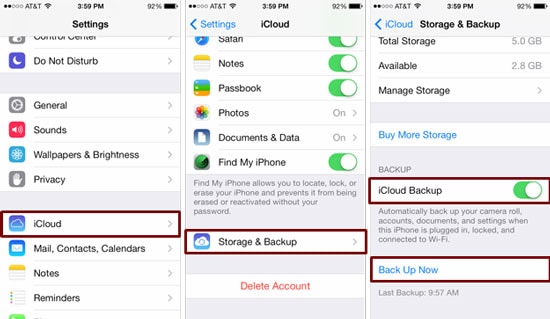
- • Trin 2. Tryk på Indstillinger> iCloud. From here, you should enter your iCloud account or Apple ID. If you don’t have one yet, you should register one first.
- • Trin 3. Tryk på Storage > Backup and then wipe the iCloud Backup på. Tryk på Backup nu.
2. How to backup iPhone on Mac via iTunes
Taking the security of private information into consideration, some people don’t want to backup iPhone via iCould, the cloud service, but prefer using iTunes. Fortunately, it’s very simple to backup iPhone on Mac via iTunes too. Below are the simple steps.
Steps to backup iPhone on Mac with iTunes
- • Step 1. Connect your iPhone with your Mac via your iPhone USB cable.
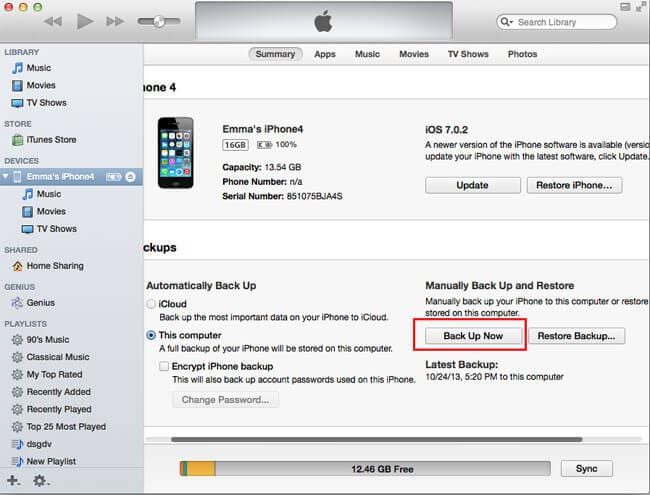
- • Step 2. Click iTunes Specifikation menuen og vælg Show Sidebar.
- • Step 3. Click your iPhone under ENHEDER in the sidebar. From the right side, you can see the option Sikkerhedskopier. Vælg Denne computer og Backup nu. Det er det!
3. Sådan sikkerhedskopieres iPhone på Mac via iTunes-synkronisering
Backing up iPhone to Mac via iTunes sync will enable your iPhone to wirelessly sync to your Mac when your phone is plugged into a power source and connected to the same WiFi network. So, this is a convenient method to backup iPhone on Mac.
Steps to backup iPhone with iTunes sync
- • Step 1. Launch iTunes and connect your device with Mac and .
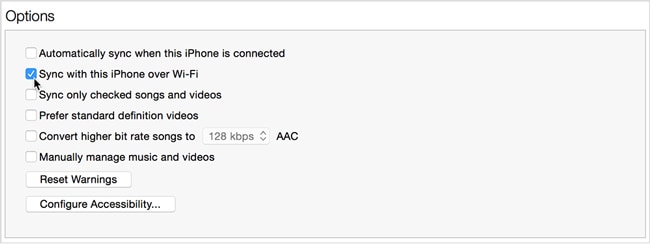
- • Step 2. On the Summary tab, tick ‘Sync with this iPhone over Wifi’
Fordele og ulemper:
iCloud backup is very convenient and easy. You can finish all the process on your phone, no need to download a software on your computer. But you are not allowed to backup iPhone data selectively. And you can’t Få adgang til iCloud-backup to veiw your iCloud backup files.
iTunes backup is not that convenient like iCloud backup, you need to handle it one your computer. You can backup the whole device in one click, but this is also the weakness: you can’t selectively backup your iPhone data. If you restore your iPhone with iTunes, your iPhone data will be covered.
Bemærk: In order to make up for the flaws of iCloud backup and iTunes backup, we will show you a better way to backup iPhone to Mac in the next part.
Del 2. Sådan sikkerhedskopieres iPhone til Mac med DrFoneTool (fleksibel og hurtig)
I’ve mentioned how to backup an iPhone via an iTunes above. However, this backup only contains iPhone settings, you can’t backup file selectively. But DrFoneTool – Phone Backup (iOS) can help you backup your iPhone notes, messages, contacts, photos, Facebook messages and many other data in 3 steps.

DrFoneTool – Telefonsikkerhedskopiering (iOS)
Selectively backup iPhone to Mac in 3 minutes!
- Preview and export what you want from the backup to your Mac.
- Intet datatab på enheder under gendannelsen.
- Sikkerhedskopier og gendan selektivt alle data, du ønsker.
-
Virker til alle iOS-enheder. Kompatibel med den nyeste iOS 13.

- Fuldt kompatibel med Windows 10 eller Mac 10.14.
Trin til, hvordan du sikkerhedskopierer iPhone til Mac med DrFoneTool
Trin 1
To backup iPhone to Mac, run DrFoneTool firstly and connect your iPhone to Mac. DrFoneTool will detect your iPhone automatically, after you see the follow windows, please choose ‘Phone Backup’.

Trin 2
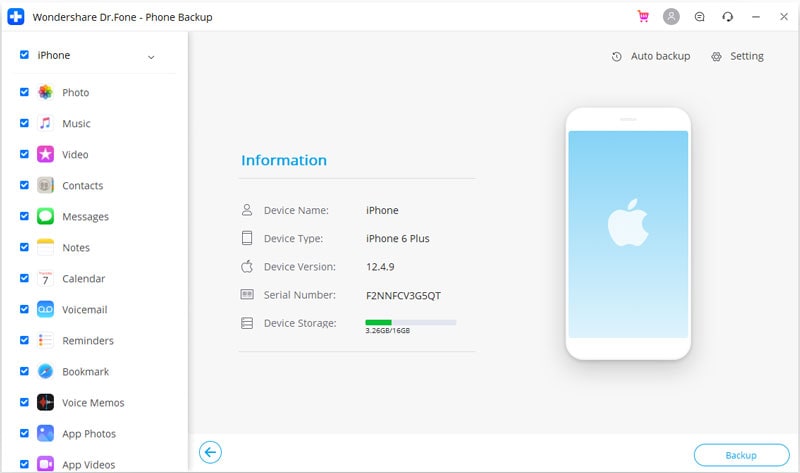
Når din iPhone er tilsluttet, skal du vælge den type data, der skal sikkerhedskopieres, blot vælge den filtype, du ønsker, og derefter klikke på knappen ‘Sikkerhedskopi’.
Trin 3
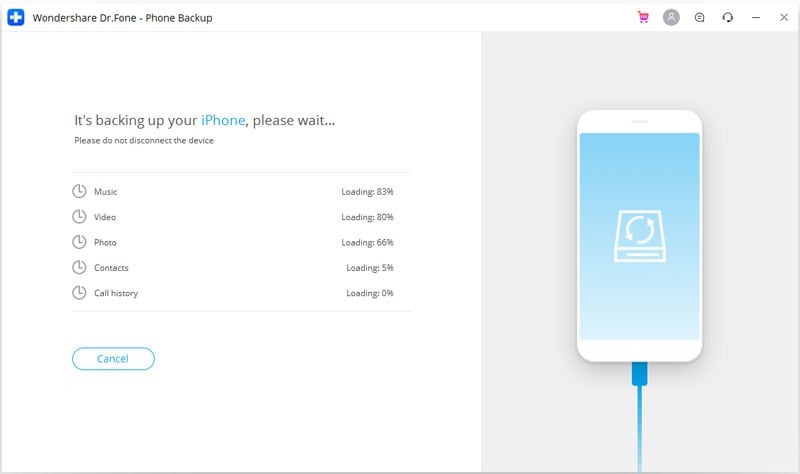
Nu sikkerhedskopierer DrFoneTool dine iPhone-data, denne proces vil tage nogle minutter. Afbryd venligst ikke din enhed.
Trin 4
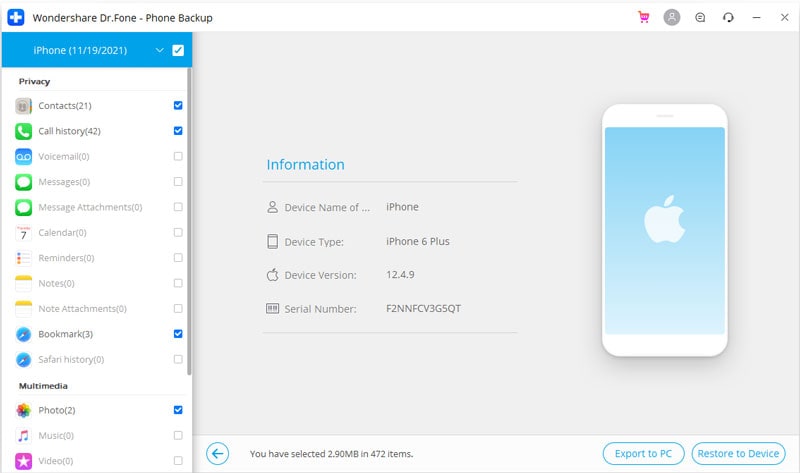
Når iPhone backup-processen er afsluttet, kan du kontrollere alt indholdet på din iPhone, og derefter vælge dem, du vil eksportere, klik blot på ‘Eksporter til pc’. Der er to valgmuligheder: ‘Eksportér kun denne filtype’ og ‘Eksporter alle de valgte filtyper’, vælg blot den rigtige du vil. Når du har eksporteret dine iPhone-sikkerhedskopier til Mac, kan du gå direkte til at se dem på din computer.
Fordele og ulemper
DrFoneTool giver dig mulighed for at forhåndsvise og selektivt sikkerhedskopiere iPhone til Mac, hvilket er et fleksibelt design for brugere, da de fleste brugere måske bare vil sikkerhedskopiere en del af deres iPhone-data til Mac. Hvad mere er, kan du direkte se iPhone backup-filer made by DrFoneTool. From the above introduction, we can know that the whole process of backing iPhone to Mac is very easy. These friendly user experiences are what iTunes and iCloud can’t reach. But if you’d like to backup iPhone to Mac in this way, you have to download DrFoneTool on your computer.
Del 3. Placering af iPhone Backup-fil (Mac) og inkluderede filtyper
Where to find iPhone backup file on Mac?
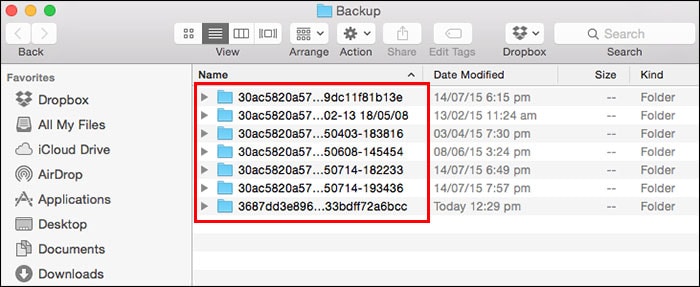
Når du har sikkerhedskopieret iPhone til Mac, kan du finde sikkerhedskopifilen i denne mappe: Bibliotek/applikationssupport/MobileSync/Backup. To check all iPhone backups, you should hold down Command, Shift, and G key on the keyboard to enable the Go to menu. Enter the directly: Bibliotek/applikationssupport/MobileSync/Backup.

Hvilken slags filer er inkluderet i sikkerhedskopien?
Hver sikkerhedskopi, du har lavet på iTunes, inkluderer optagelser af videoer og billeder i iPhone Camera Roll, kontakter og kontaktfavoritter, kalenderkonti og kalenderbegivenheder, safaribogmærker, noter og mere. Filer i iPhone-sikkerhedskopi kan ikke ses og hentes. Dette problem kan løses i ‘del 2’.
Seneste Artikler

