Fix iPhone Messages not Syncing with Mac
When you set up iMessage on a Mac, you use an Apple ID during the set-up process. This ensures that iMessages sync across all devices that use that Apple ID. But sometimes this process doesn’t quite work as it should, and you find that sometimes the iMessages fail to sync on your Mac or other similar problem.
In this article, we are going to offer you 5 effective ways to fix this problem – fixed iPhone messages not syncing with Mac. Try each one in turn until the problem has been fixed.
Part 1. Top 5 solutions to fix iPhone messages not syncing with Mac
The following are some of the most effective solutions to try and fix this problem.
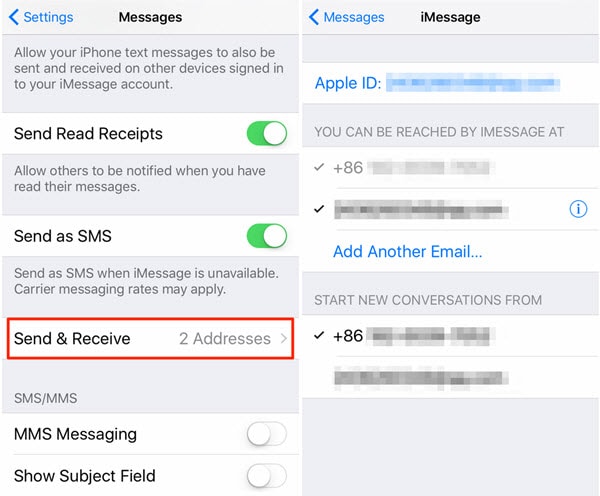
1. Make sure that you’ve Activated iMessages Email Addresses
On your iOS device, go to Settings > Messages> Send & Receive and make sure that under “You Can Be Reached by iMessage at” make sure that the phone number or email address is checked.
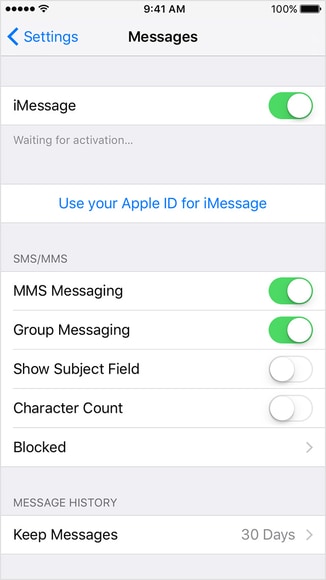
2. Turn off iMessage and then turn it back on
If you are sure that you have set up iMessages correctly but are still having syncing issues, simply resetting iMessage can fix the problem.
To do this, go to Settings > Messages and then turn off iMessage on all devices.
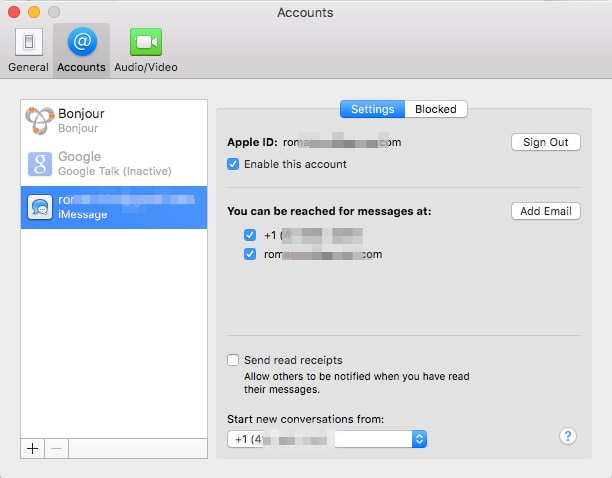
On your, Mac click on Messages > Preferences > Accounts and then uncheck “Enable this account” to close Messages.
Wait a few seconds and then enable iMessages again.
3. Confirm Mobile Phone Number with Apple ID
You may also want to ensure that the mobile number and email addresses you use on your account are correct. Go to the Apple website and log in with your Apple ID. Check under “Account” to make sure that you have the correct phone number and email address.

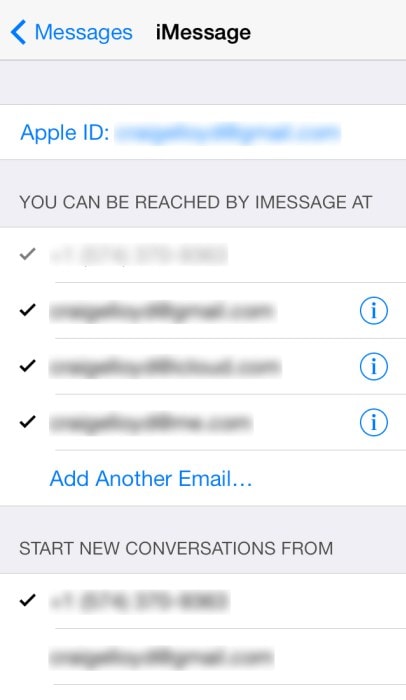
4. Check that iMessage is Set up Correctly
It is possible that you didn’t set up iMessages correctly, and it wouldn’t hurt to check. For your iMessages to sync, you need to sign in with the same Apple ID across all devices. Fortunately, there is a simple way to check.
Simply go to Settings > Messages > Send & Receive and make sure that the email address shows up at the top, next to the Apple ID. If it doesn’t, tap on it to sign in with your Apple ID.
5. Restart All Devices
If you are certain that iMessage set up is correct on all devices, simply restarting the devices can jump-start the process and get your iMessages syncing again. Restart all iOS devices and the Mac and then try again.
DrFoneTool – Systemreparation
Ret iPhone-systemfejl uden tab af data.
- Ret kun din iOS til normal, ingen datatab overhovedet.
- Løs forskellige iOS-systemproblemer fast i genoprettelsestilstand, hvidt Apple-logo, sort skærm, looping ved start osv.
- Retter andre iPhone-fejl og iTunes-fejl, som f.eks iTunes fejl 4013, error 14, iTunes fejl 27,iTunes fejl 9Og meget mere.
- Virker til alle modeller af iPhone, iPad og iPod touch.
- Fuldt kompatibel med den nyeste iOS.


Part 2. Bonus tips: transfer iPhone messages, contacts, videos, music, photos to Mac
If you are still having trouble syncing messages across your devices even after restarting all devices, it may be a good idea to seek an alternate solution. DrFoneTool – Phone Manager (iOS) provides you with an easy way to transfer messages and other data from your iOS device to your Mac. It is, therefore, a great solution when you want to have a copy of or a backup of the data on your Mac, especially when you’re unable to sync the data.
The following are just some of the features that make DrFoneTool – Phone Manager (iOS) the ideal solution to transfer data to your computer.
DrFoneTool – Phone Manager (iOS)
Transfer iPhone Data to Mac/PC Without Hassle!
- Overfør, administrer, eksporter/importér din musik, fotos, videoer, kontakter, SMS, apps osv.
- Transfer music, photos, and videos from Mac/PC to iPhone, or from iPhone to Mac/PC.
- Overfør musik, billeder, videoer, kontakter, beskeder osv. fra en smartphone til en anden.
- Overfør mediefiler mellem iOS-enheder og iTunes.
- Fuldt kompatibel med iOS 7, iOS 8, iOS 9, iOS 10, iOS 11, iOS 12, iOS 13, iOS 14 og iPod.
How to use DrFoneTool – Phone Manager (iOS) to Transfer iPhone data to your Mac?
Download and install DrFoneTool to your computer and then follow these simple steps to transfer iPhone data to your Mac.
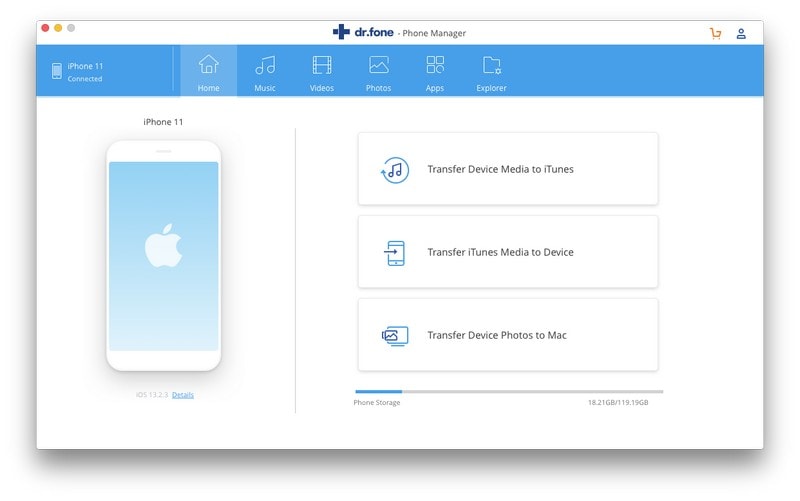
Step 1. Run DrFoneTool and select Phone Manager from the home window. Then connect the iOS device to the computer using USB cables.
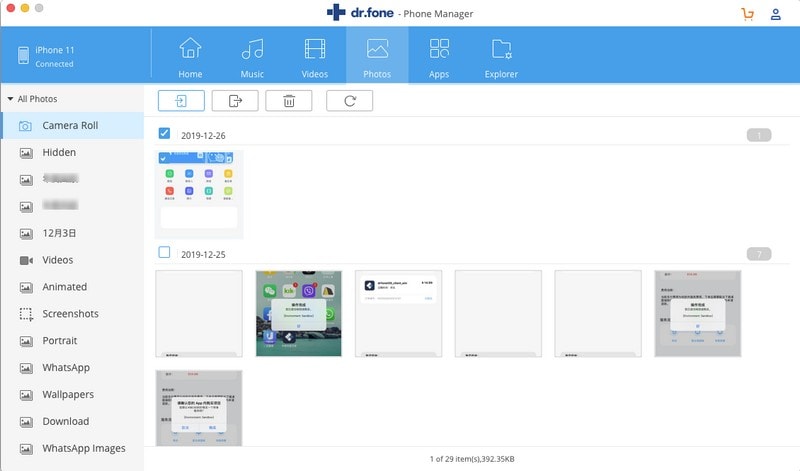
Step 2. DrFoneTool can help you transfer iPhone music, photos, videos, contacts, SMS to Mac easily. Take iPhone photos for example. Go to the Photos tab and select the photos you would like to transfer to Mac. Then click Export to Mac.
We hope you’re able to fix your sync problem. In the meantime, DrFoneTool – Phone Manager (iOS) offers a great way to transfer data from your iPhone to your Mac. Try it! It’s fast, reliable, and easy to use.
Seneste Artikler