4 Eenvoudige manieren om iCloud-foto’s te openen
Are you finding it hard to access iCloud photos? Don’t worry – it happens with all of us at times. Whenever there is a problem with iCloud sync, users wonder how to access iCloud photos. There are different ways to do it, which largely depends on the kind of device you are using. In this post, we will teach you how to access iCloud photos on iPhone, Mac, and Windows. Let’s proceed and learn how to access photos on iCloud without any trouble. You can access photos on iCloud you took from your iPhone, camera easily after reading this.
Part 1: How to access iCloud photos using DrFoneTool? (easiest way)
If you are looking for a fast, reliable, and trouble-free way to access iCloud photos on your system, then simply give DrFoneTool – Gegevensherstel (iOS) a try. Essentially, the tool is used to recover the lost content on your iOS device. Though, you can also use it to restore photos from your iCloud synced file as well. In this way, you can selectively backup the photos of your choice.

DrFoneTool – Gegevensherstel (iOS)
‘s Werelds eerste iPhone- en iPad-software voor gegevensherstel
- Geef drie manieren om iPhone-gegevens te herstellen.
- Scan iOS-apparaten om foto’s, video, contacten, berichten, notities, enz. te herstellen.
- Extraheer en bekijk alle inhoud in back-upbestanden van iCloud / iTunes.
- Herstel selectief wat u wilt van iCloud/iTunes-back-up naar uw apparaat of computer.
- Compatibel met de nieuwste iPhone-modellen.
It is a part of the DrFoneTool and runs on both, Mac and Windows systems. Compatible with every leading iOS device, it will certainly come in handy to you on numerous occasions.
Opmerking:: If you haven’t backed up your phone’s data before and your phone’s model is iPhone 5s and later, the success rate of recovering music and video by DrFoneTool – Recovery(iOS) will be lower. Other types of data can be recovered without any limitation. To learn how to access iCloud photos using DrFoneTool, follow these steps:
1. Launch DrFoneTool on your system and select the option of “Recover” from the home screen.

2. Connect your device to the system and wait for a few seconds as DrFoneTool will detect it.
3. From the left panel, click on the “Restore from iCloud Synced File”.
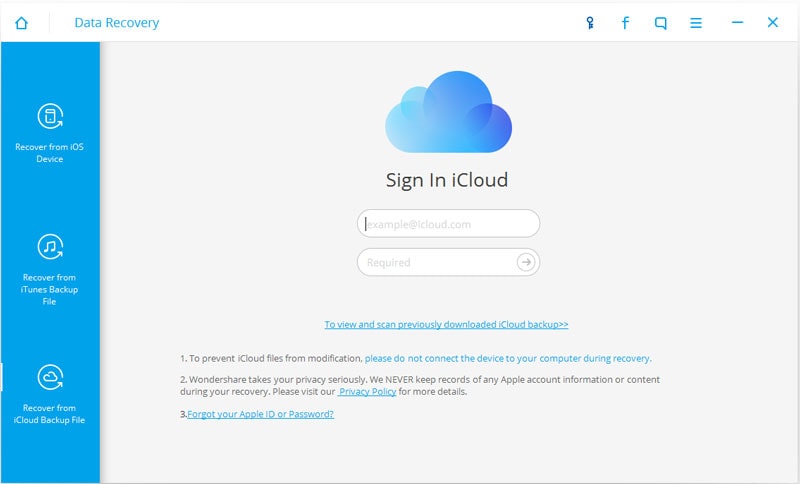
4. It will launch the following interface. Simply provide your iCloud account credentials and sign-in from the native interface of DrFoneTool.
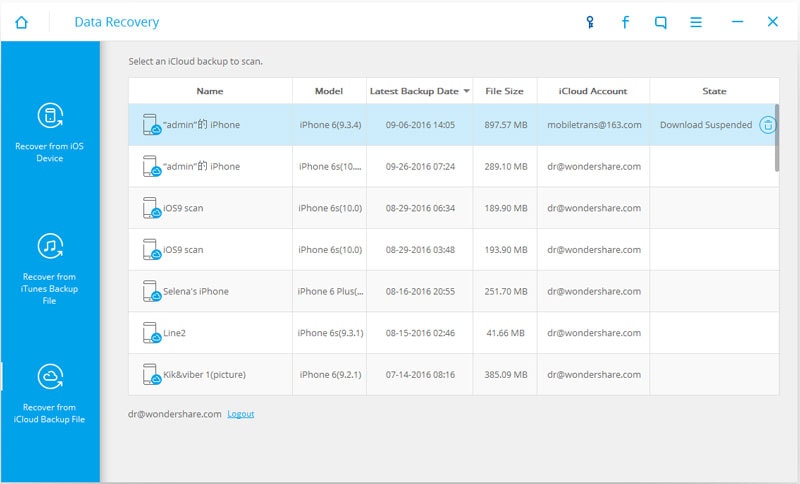
5. A list of all the iCloud Synced Files will be provided with some basic details. Simply select the iCloud Synced Files you wish to restore.
6. It will launch a pop-up form where you can select the kind of data you wish to backup. To access iCloud photos, you can check the related options under the “Photos & Videos” category.
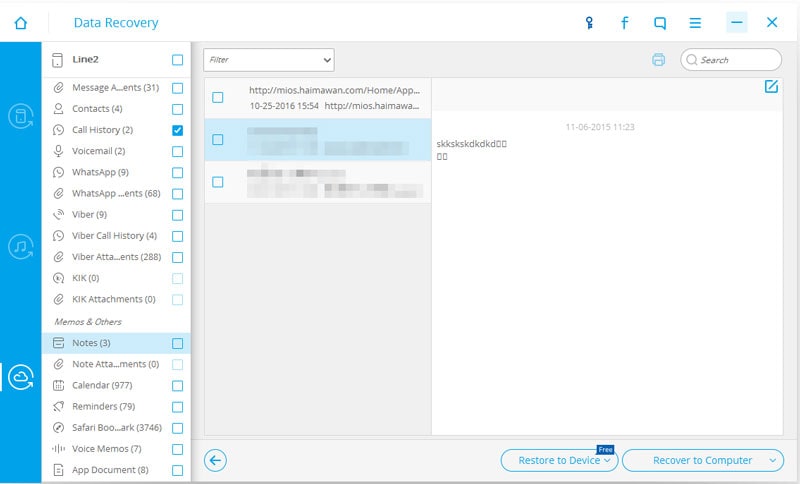
7. Click on the “Next” button to proceed.
8. Wait for a while as DrFoneTool will download the selected backup and retrieve your content.
9. Afterward, you can preview your photos and restore them to the local storage or directly to the connected device.
That’s it! By following these steps you would be able to learn how to access photos on iCloud using DrFoneTool.
Extra tips:
- 3 Ways to Restore Deleted Photos from iPhone
- How to Transfer Photo Library from iPhone to Computer
- Mijn iPhone-foto’s zijn plotseling verdwenen. Hier is de essentiële oplossing!
Part 2: How to access iCloud photos on iPhone?
If you wish to learn how to access iCloud photos on iPhone, then you don’t need to take the assistance of any other tool. Though, this process might not always yield the desired results. There are two ways to access iCloud photos on iPhone.
1. Photo Stream
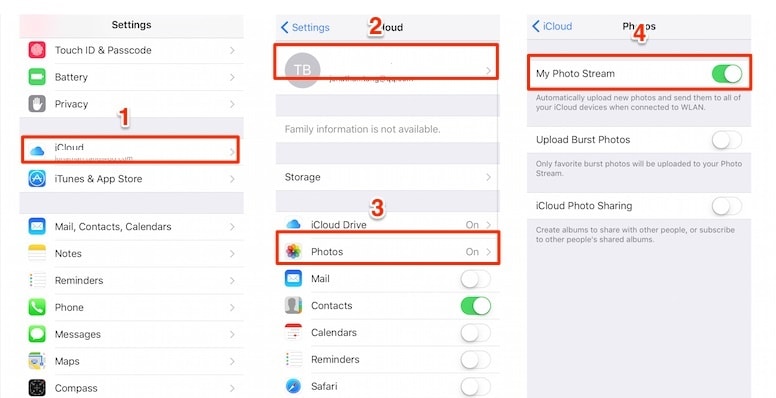
By using the Photo Stream option you can access the recently clicked photos on iPhone that are clicked by any other device. Needless to say, all these devices must be synced with the same iCloud account. Additionally, the quality of the photos on your target device might not be the same as the original one. To enable Photo Stream, go to your device’s Settings > iCloud > Photos and turn on the option of “Photo Stream”.
2. Reset iPhone and restore iCloud backup
In order to learn how to access iCloud photos on iPhone, you would be needed to fabrieksinstellingen van uw iPhone and restore it entirely. Besides your photos, all the other kind of content will also be restored. Since it will reset your device entirely, we recommend that you should avoid taking this risk. Nevertheless, you can learn how to access iCloud photos on iPhone by following these steps:
1. Go to your device’s Settings > General > Reset and tap on the “Erase all content and settings” option.
2. Confirm your choice by providing your passcode and tapping on the “Erase iPhone” option again.
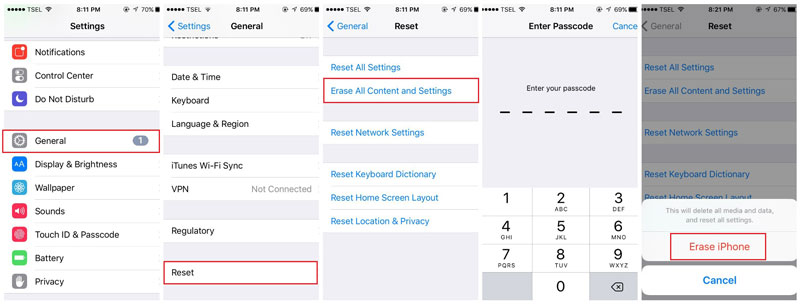
3. Your phone will be restarted with default settings.
4. While setting up your device, tap on the “Restore from iCloud Backup”.
5. Sign-in with your iCloud credentials and choose the backup file you wish to restore.

Part 3: How to access iCloud photos on Windows PC?
If you have a Windows system, then you can easily learn how to access photos on iCloud and keep your content handy. In this way, you can access your iCloud photos on Windows instantly. In order to learn how to access iCloud photos on Windows, follow these simple instructions:
1. To start with, download iCloud on your Windows system by visiting its official page here: https://support.apple.com/en-in/ht204283.
2. Once you have installed and set up iCloud on Windows, launch its application.
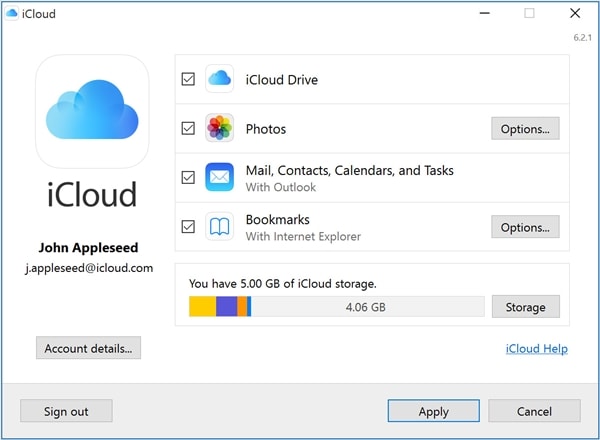
3. Enable the Photos section and click on the “Options” button.
4. Make sure that the iCloud Photo Library and Photo Stream options are enabled.
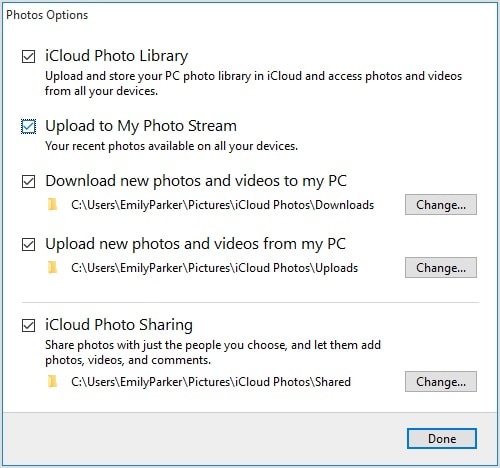
5. Furthermore, you can also change the location to save your iCloud photos.
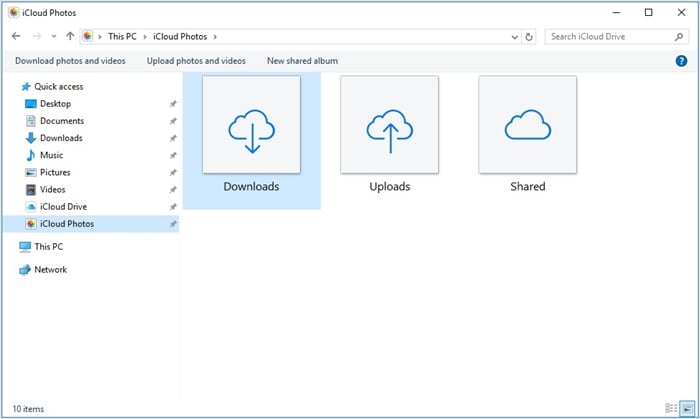
6. After your photos will be synced, you can go to the respective directory and view your iCloud photos (in different categories).
Part 4: How to access iCloud photos on Mac?
Just like Windows, Mac also provides a seamless way to access your iCloud photos easily. By following this technique, you can manage your photos from different devices in one place and can take its backup as well. To learn how to access iCloud photos on Mac, follow these steps:
1. Go to the Apple menu and click on “System Preferences”.
2. From here, you can open the iCloud app setting for your Mac.
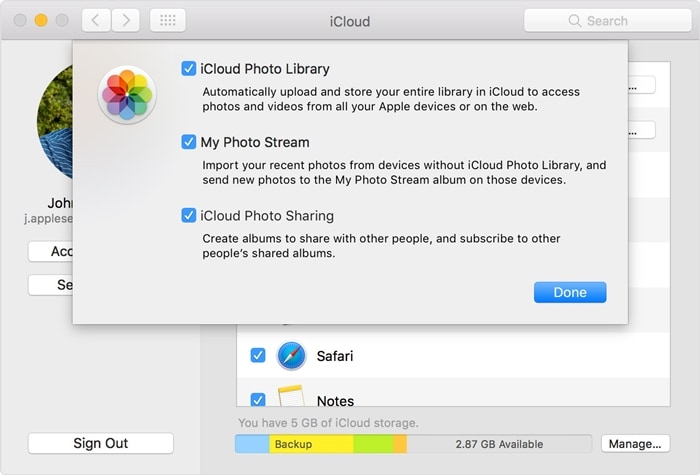
3. Now, go to the iCloud Photos options and enable iCloud Photo Library and My Photo Stream.
4. Save your changes and exit the application.
5. Once your photos would be synced, you can launch the Photos app and access the synced photos listed under different sections.

By following these convenient and easy solutions, you can learn how to access photos on iCloud without much trouble. Since DrFoneTool toolkit can be used to selectively restore your iCloud photos without causing any data loss, it is considered as an ideal solution to access iCloud photos. Now when you know how to access iCloud photos on different devices, you can certainly keep your photos handy and guide others as well.
Laatste artikels

