How to Wipe iPhone Remotely When It’s Lost or Stolen?
iPhones are simply wonderful devices. From making a call to controlling a drone flying in the air, you can literally do anything with a good iPhone. Every waking day is spent looking at it for one or the other reason. From simple day to day activities to complex stuff, we depend on our iPhone. But have you ever imagined yourself losing your mini guide? It will be as if all options are locked up for you. Also, losing an iPhone means you no longer have the access to its function. In such a situation, there is a real danger of data theft, identity theft and much more. If a lost iPhone falls into the hand of a person with bad scruples, you can never know what will happen. iPhone thieves might get access to compromising data, pictures and videos that they may use to their advantage. At times, you may even get robbed of your savings if you had the details of your bank accounts and numbers save in your iPhone. Then there is the danger of another person stealing your identity as well. But all these are totally avoidable if you remote wipe iPhone immediately after you find out that you have lost your iPhone. If you are quick to remote wipe iPhone, you can hope to be safe.
In the following sections, you will be able to find out how you can remote wipe iPhone to safeguard your device.
Part 1: How to Remotely Wipe iPhone Using Find My iPhone?
Losing an iPhone is deplorable. By losing one, you not only lose a device used for communication but also many other important information stored in it. To prevent your personal details and information from going into the hands of mischief mongers, you need to enable certain settings on your device. If you have enabled it already, you can wipe iPhone remotely. Whether you are trying to wipe the data in your iPhone remotely because you lost it or just reading for learning purposes, follow the steps given below to wipe your device remotely.
Before being able to wipe iPhone remotely, you need to have the “Find My iPhone” feature enabled on your device. To do this, go to Settings App. Now, scroll down and tap on “iCloud”. Then navigate to the bottom and toggle “Find My iPhone” to ON position.
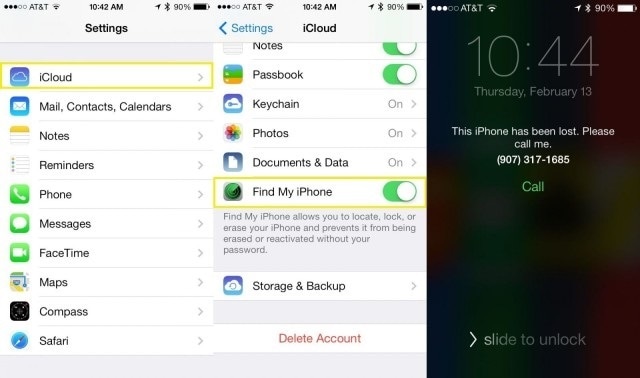
Step 1: open iCloud.com
On a different device, use a web browser to open iCloud.com and login in to your account by using your Apple ID credentials. Alternatively, you can also launch the “Find My iPhone” app on any of your other devices.
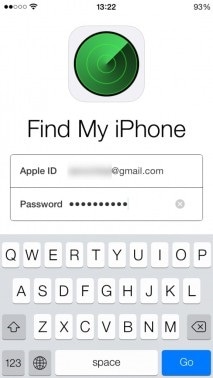
Step 2: Select the iPhone icon
Once you are in, you will be able to see the Maps Window which will show all your connected devices. Tap on “Devices” option in the upper left corner of the screen and select your iOS device that you wish to wipe remotely.
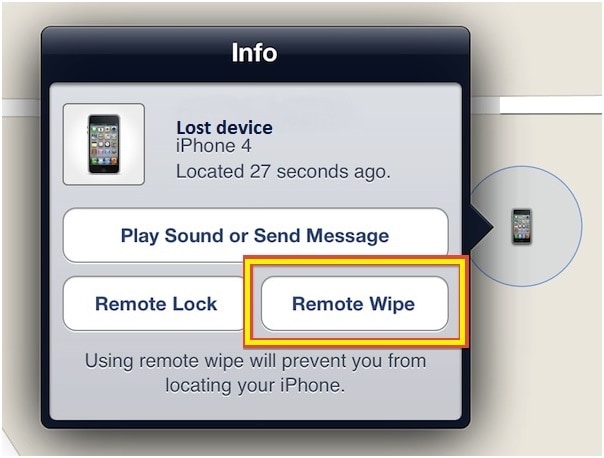
Step 3: Remote Wipe your iPhone
Tap on the blue coloured icon near the name of your iPhone. a pop-up will appear. Tap on “Remote Wipe” option.
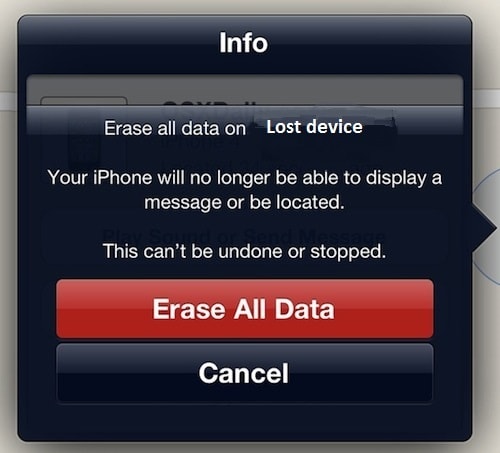
Step 4: select “Erase All Data”
After that, iPhone will ask for your confirmation to erase all data related to your lost iPhone. Confirm it by tapping on “Erase All Data”.
The iPhone that you just wiped will disappear from the list of your devices. Choose this as your last resort as you won’t be able to find you iPhone if you do this.
Part 2: How to Enable Erasing Data after Too Many Failed Passcode Attempts?
When there is a danger of losing your iPhone and the details that are stored in it, you need to take special care of making the device inaccessible by anyone other than you. This will be your bulwark against those trying to dig into your device for information. To help serve the cause, Apple has designed the iPhone to become inaccessible for some time whenever your iPhone’s passcode is typed wrongly in continuous attempts. However, anyone with a knack for hacking iPhones can get over and find your information. To avoid it from happening Apple allows you to set the iPhone to erase your device’s data after too many failed passcode attempts.
To enable erase iPhone remotely, follow the simple steps given below.
Step 1: Launch “Settings” app
Open the Settings app on your device by tapping on the “Settings” icon.
Step 2: open “Touch ID & Passcode”
Scroll down and tap on the “Touch ID & Passcode” which has a red coloured fingerprint icon.
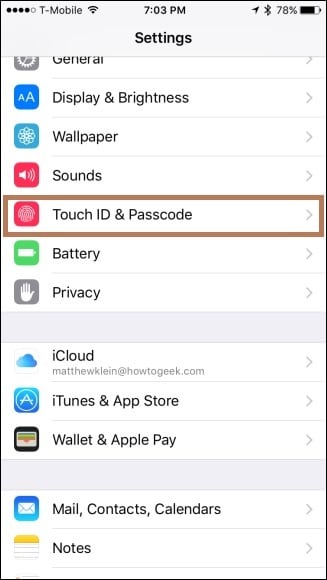
Step 3: enter the Passcode
You now need to enter your six-digit passcode on your iPhone.

Step 4: set the “Erase Data” function
Scroll down to the bottom of the screen and toggle the slide bar of “Erase Data” option to ON position.
Now the Erase Data function is enabled in your iPhone. If at all there is a failed attempt to gain entry to your iPhone, the device will erase all the data in it.
Part 3: How to Protect your Personal Data if You Don’t Have the Two Options Above?
If you are able to use either of the methods described above, you will be able to protect your personal details without any problem. However, if you have not enabled Erase data or Find My iPhone on your missing device you cannot be sure of that. However, you can take a few steps to prevent your personal details and protect your data.
Some things that you can do if you cannot erase iPhone remotely are given below.
1. Report about your lost iPhone to the local law enforcement agency. If you are asked for the serial number of your device, provide it to them to help protect your data.
2. Change the passwords of all the internet accounts like your email accounts, Facebook, Instagram etc logged on your device.
3. Make sure to change your Apple ID password immediately so that no one can gain access to your iCloud data and other such services.
4. Inform about the loss/theft to your wireless carrier. By doing this you can disable your iPhone’s network and prevent phone calls, messages etc.
Thus using the methods outlined above, you can protect your iPhone as well as the details stored in it. Although the methods described above are easy to perform, they can be useful only if they are enabled. So, it is advisable to enable them as early as possible because Find My iPhone is the only way to find you lost iPhone. Also, making regular backups of all the data in your iPhone will make your work easier when you happen to wipe or erase your iPhone data.
Siste artikler